Starting with Hugo
Posted November 29, 2017 ‐ 4 min read
Yet another static site generator

According to one of my own researches, I’ve found Hugo which is static site generator for your blog page.
With this article, I wanted to show you how I created a very basic static web page with using Hugo.
On Local
The project itself is written with Go so if you are Go developer feel free to compile it with using its source.
If not, there are some binary files for your OS and other alternative ways to install it, please check this page.
brew install hugo
After installing Hugo, you will be able to work with it on your terminal.
Just create your new site
hugo new site my-blog
cd my-blog
hugo server
That could be very clear page as your home page because we have no theme or any content right now. Please check http://localhost:1313/
Adding our new theme, I’ve picked Hyde Y theme from Hugo Theme Gallery.
git clone https://github.com/enten/hyde-y.git themes/hyde-y
rm -rf themes/hyde-y/.git
echo 'theme = "hyde-y"' >> config.toml
hugo server
Congrats ㊗️

Deploying to GitHub Pages
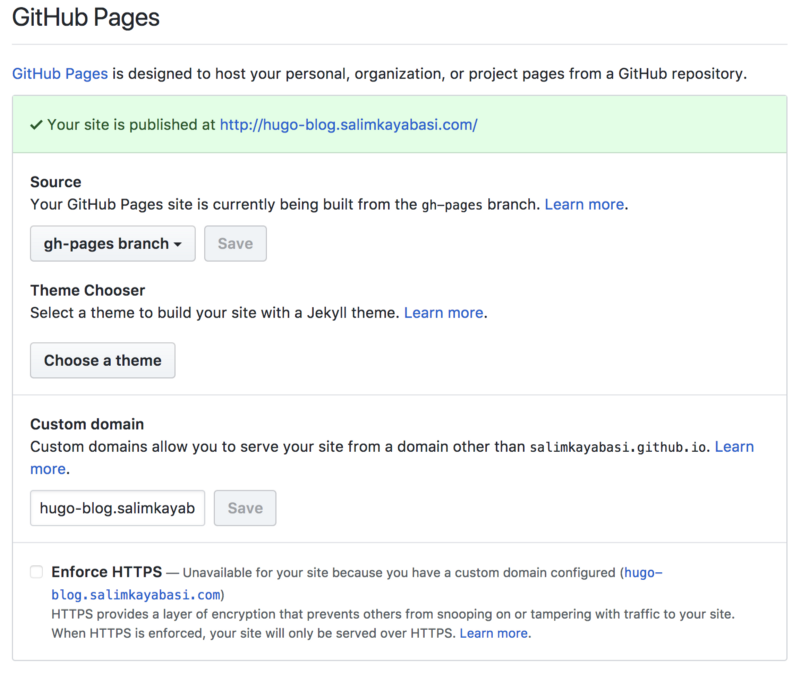
As we know, GitHub Pages is a service which you can host your static files for free. I’ve created a new github repository for hosting my new blog page.
Don’t forget to exclude public folder from your github repo or you can check my configuration for that.
Somehow we need to build those files with using Hugo and deploy them on github pages. Working with TravisCI for your open-source project is also free.
We need to create a file which named .travis.yml
In Travis, we can choose our working platform so defining language: go would be helpful for working with Hugo.
There are some flow to build your project but don’t forget that your own source code is not a Go project so we need to skip installing dependency part. Here, Hugo is using govendor to fetch its own dependencies.
Before running our build scripts, we need to install Hugo and related dependencies with using govendor.
before_install:
  - go get github.com/kardianos/govendor
  - govendor get github.com/gohugoio/hugo
  - go install github.com/gohugoio/hugo
Now, we are able to generate our html files with using Hugo.
script:
  - hugo version
  - rm -rf public || exit 0
  - git clone https://github.com/$THEME\_REPO.git themes/current-theme
  - rm -rf themes/current-theme/.git
  - hugo
Hugo is using public folder as output folder by default so it would be great to remove public folder if we have. On local development, we cloned into themes folder. It would be same for our travis configuration. Managing theme in separated github repository will help you to focus on your content. Hidden trick, use always same folder for your theme and no need to change your theme config on config.toml file
Hugo generated our html files and we are ready to publish them on GitHub Pages.
deploy:
  provider: pages
  skip_cleanup: true
  github_token: $GITHUB_TOKEN
  local_dir: public
  fqdn: $DEPLOY_DOMAIN
  on:
    branch: master
On Travis, they have a deployment tool for github pages. No need to clean the working folder before releasing because we will use public folder. With the help of fqdn configuration, we can use our custom domain for our blog page.
Final version of Travis configuration is accessible on github also.
Last steps
On GitHub, we need to enable github pages feature regarding to our configuration.
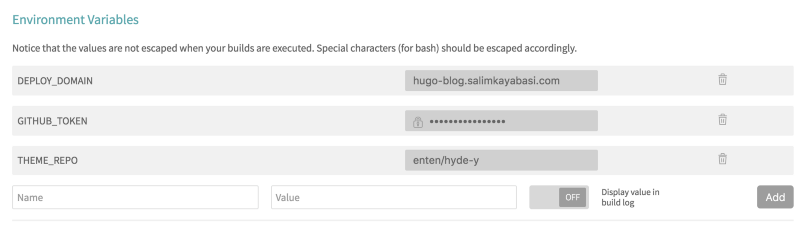
Don’t forget to pass your environment variables to Travis for successful build process.
- DEPLOY_DOMAIN will be your custom domain address
- GITHUB_TOKEN is your private access token to deploy generated files to github
- THEME_REPO is github repo name for your favourite theme
Here is the my Cloudflare configuration for custom domain

First Page
hugo new posts/first-page.md
# my-blog/content/posts/first-page.md created
Still, you can work with Hugo CLI or just create your markdown file on given folder above.
Conclusion
Please check my source code on my github repo to see more example about blogging with Hugo. Also, on Hugo’s documentation you can discover a lot of cool features for you.
Keep generating valuable content ✍️